Creating product groups can be very useful if you want to organize your products in a structured way when advertising through Google Shopping.
With these groups you can set bids and manage inventory as efficiently as possible.
Some people might leave everything lumped into “All products,” but that often makes it harder to monitor performance and focus your ad spend where it matters most. Using product groups lets you focus more on the details.
One major benefit of using product groups is that you can adjust your bidding strategies based on what is most important to you.
For example, you might have certain product lines that sell more frequently or have higher profit margins. By creating product groups, you can give those items more attention.
In this post we’ll go through all the steps you need to create product groups in Google Shopping and explain how it can help you reach your advertising goals.
About Product Groups
A product group is essentially a subset of your overall product inventory.
In Google Shopping campaigns you have to organize these items by certain attributes from your product feed in Merchant Center.
Typical attributes include product category, product type, brand, condition, item ID, and custom labels that you set up.
You can start this process with a single, catch-all product group called “All products.” This group is often automatically created when you set up a new Shopping campaign. From there you decide how detailed you want to be. Each time you subdivide that group you create more specific segments of items. This extra detail lets you set different bids on each smaller group to better match your campaign goals.
Why Create Product Groups?
It makes sense to break your inventory into several product groups for different reasons:
- More control over bidding: If you want to place higher bids on specific brands or product lines, dividing your inventory can help.
- Easier performance monitoring: Getting data on focused groups of products lets you see trends and adjust strategies more quickly.
- Excluding certain products: If there are items you do not want to advertise, you can remove them from your ads via product groups.
- Testing and adjusting bids: Trying different bids and strategies across various product groups can help you find what works best.
Use these divisions wisely. Too many can make tracking performance overwhelming, while too few might mean missing opportunities. The idea is to achieve a proper balance.
Before You Start: Preparations
There are two simple things to have ready before creating product groups:
- A well-organized product feed in Google Merchant Center.
Be sure to include all relevant attributes like brand, product category, and product type. - A clear bidding strategy.
Decide which products or categories should receive different bid levels. It might help to start broadly and narrow things down as you see what sells, so having a clear bidding strategy in place is useful.
Let’s go through how to set up these groups and get started.
Step-by-Step: Setting Up Product Groups
Step 1: Access Your Google Ads Account
Log in to your Google Ads account.
Once you’re signed in, go to the Campaigns tab and select the Shopping campaign where you want to set up product groups.
The process might vary with updates to the interface, but generally:
- Click on “Campaigns.”
- Select your Shopping campaign.
- Choose the appropriate ad group.
Step 2: Find the Product Groups Tab
On the left-hand menu you should see an option labeled “Product Groups.” This is where you can subdivide your products. If you don’t see it immediately, check that you are in the correct campaign type (Shopping campaign) and the right ad group. A short, simple note may help: keep an eye out for the “Product Groups” tab once you are in the right area.
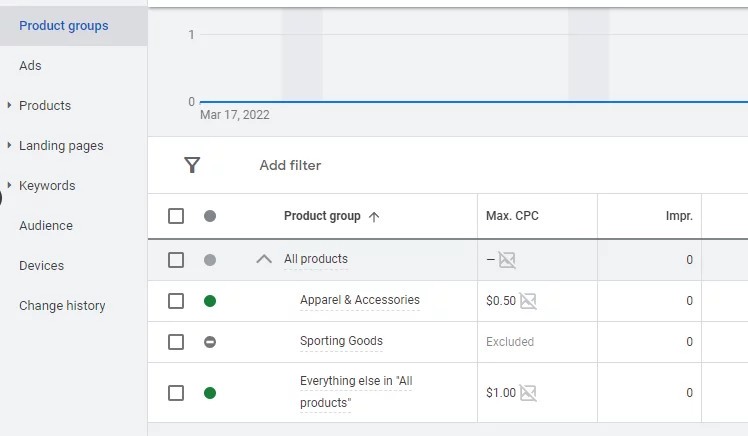
Step 3: Start With the “All products” Group
Every new Shopping campaign starts with a default “All products” product group. This group contains everything from your Merchant Center feed that isn’t filtered out. While you could set a uniform bid for your entire inventory, most advertisers prefer further segmentation.
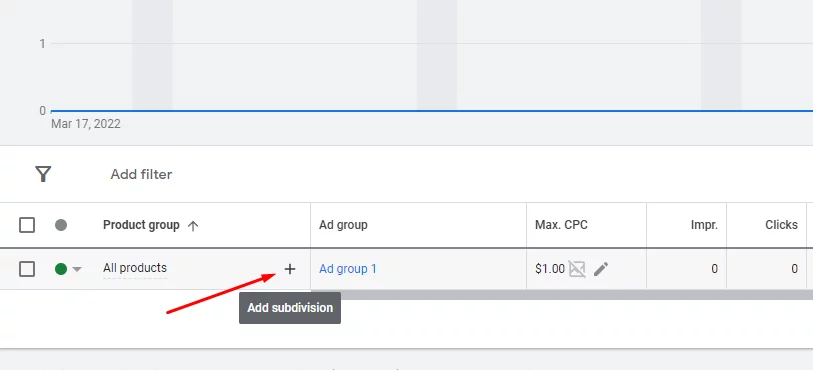
Click on the pencil icon or the “+” icon next to “All products” to begin subdividing. This is where you determine how to categorize your products.
Step 4: Subdivide by Attributes
Choose which attributes to use when breaking down your inventory. Common examples include:
- Brand
- Category
- Product Type
- Condition
- Item ID
- Custom Labels
A custom label can be anything such as “Seasonal,” “BestSeller,” or “Clearance” that you’ve assigned in your Merchant Center feed.
Pick the subdivision that fits your strategy best.
For example, if you sell many different brands with varying profit margins, splitting by brand might be useful.
Step 5: Assign Bids or Exclude
After subdividing, set a bid for each new product group. For the items you do not wish to advertise, choose to exclude them. You can change these settings later if you need to. Remember, each product can only belong to one group that you bid on, even though it can still be organized in other ways.
An Example of Subdividing
Below is an example of how you might divide a group of products by brand and then further by product type:
After you create this breakdown, you could set a higher bid for Brand A > Shoes while choosing a lower bid for Brand B > Hats if that fits your campaign goals.
Working With Custom Labels
Custom labels allow you to organize products in a way that suits your needs, which is helpful if your inventory does not easily match Google’s standard categories. These labels are set in Merchant Center when you add or edit your product information. For example, you might tag a group of items with “Holiday” or “HighMargin” based on their profit potential.
When creating your product groups in Google Ads, you can select “Custom label 0-4” (corresponding to the label slot you used) as the subdivision attribute. This option makes it easier to target products that are more relevant at specific times of the year or have better returns.
It can also work well to use custom labels for grouping items by price range. For example, a label like “Under20” or “Over100” lets you adjust bids so that more expensive products receive the extra focus needed in your strategy.
Bidding Strategies and Adjustments
When setting up product groups each one requires its own max CPC (cost-per-click) bid. If you know that a group converts well or brings in good profits, you might choose to bid higher. For products that are riskier or convert less often, you might use a more careful bid.
Filters can also remove products that you do not wish to advertise. Some advertisers choose to exclude items that do not meet a margin threshold or are frequently out of stock. Removing these products helps prevent spending on items that do not contribute positively to your campaign.
• Check performance regularly
• Adjust bids as you collect data
• Refine your subdivisions when necessary
Keeping Track of Inventory Filters
Inventory filters let you decide which products will be included in a Shopping campaign. These filters are handy if you have a large catalog but want to advertise only select categories or conditions. When editing your campaign settings the inventory filter section lets you choose:
- A product attribute (such as “brand,” “product type,” “item ID,” or “custom label”)
- A matching condition (such as “equals,” “contains,” or “does not equal”)
- The value for that condition
Any product that does not meet the set condition will not show up in your ads. This filtering is separate from subdividing into product groups but can affect which items are eligible for inclusion.
Common Pitfalls and How to Avoid Them
Pitfall 1: Over-segmentation
Breaking your inventory into too many groups can make management difficult. You might end up tracking a large number of small groups that do not receive enough traffic to provide reliable data. Try grouping similar items together to maintain a good level of traffic and actionable data.
Pitfall 2: Under-segmentation
Setting one bid for “All products” may be simple to manage, but it can lead to overspending if some categories or product lines need special treatment.
Pitfall 3: Ignoring conversion data
If bids are set without looking at historical performance, you might miss key insights. Analyze which products bring in conversions then adjust bids based on the numbers.
Monitoring and Reporting
Google Ads offers a variety of metrics to help you understand how each product group performs.
You can check data such as:
• Clickthrough rate (CTR)
• Cost
• Conversions
• Conversion value
• Impressions
Focus on conversion data if revenue or leads are your primary goals. You can also break down your data by device or other factors to pinpoint areas for improvement.
If a product group is not performing as expected, consider revising the bid or reorganizing the groups.
Sometimes you will notice differences between the metrics shown in the Product Groups tab and those in the Campaign, Ad Group, or Ads tabs.
This discrepancy is because product-level data might count multiple impressions when several products appear in a single ad, even though the campaign view may register only one impression.
Timing Your Adjustments
There is usually no need to constantly tweak bids every day. It is better to wait and gather enough data before making changes—this might take a few weeks depending on your traffic.
A typical schedule might look like:
• Week 1-2: Let your new product group subdivisions run to collect performance data.
• Week 3: Review conversions, conversion value, and overall cost. Notice which groups are performing better or worse.
• Week 4: Adjust bids or further divide groups if particular categories or brands show distinct trends.
Then repeat the cycle so that over time you can settle on the right approach for each group.
Refining Your Structure
You might find that a specific product group such as “Shoes” is still too broad. If your store sells running shoes, sandals, and slippers, you might consider splitting the group further. On the flip side, if a group is too small to provide reliable data, think about combining them.
If performance varies a lot, this could be due to changing consumer trends, seasonal factors, or increased competition. Adjusting product groups seasonally may help, especially if you sell items that are more popular during certain times of the year, like holiday decor or summer clothes.
Using Product Groups with Other Features
While product groups determine which products appear in your ads, you can combine them with other Google Ads features, such as:
• Negative keywords for Search campaigns
• Location targeting
• Scheduling or dayparting
These features mainly affect search campaigns and other formats, but proper grouping of your products can still provide valuable insight for your overall advertising plan.
For example, if your store features many “Brand A Hats” that sell well in specific regions, you might add location targeting or adjust scheduled ad times to boost performance.
Lists and Best Practices
Here are a few quick reminders:
• Keep your Merchant Center feed updated regularly.
• Use clear product titles and high-quality images, which are essential for Shopping ads.
• Regularly check for disapproved items that might not appear in auctions.
• Consider using custom labels for special promotions or seasonal collections.
• Start with broad subdivisions and refine them gradually as you gather data.
Adapting to Performance
If you notice that certain product groups are underperforming because of a low conversion rate or high cost without enough revenue, consider these actions:
- Lower the bid to reduce unproductive spending.
- Review product attributes and data feed information for any errors or missing details.
- Check if reviews or price differences might be affecting the product’s performance.
- Remove products that consistently do not contribute positively to your campaign.
A single product that performs poorly can affect the overall campaign, so monitoring closely is important.
When to Use an “All products” Group
There are times when relying mainly on a single “All products” group can work best. For a small store with only a few products, extensive subdivision might not be necessary and tracking remains straightforward. However, as you add new lines or expand your store, consider dividing your products into groups.
This approach is also useful if you have just started a new Shopping campaign and need to get running quickly without spending too much time on detailed management.
Just be ready to review and adjust once you collect enough data.
Adapting with Performance Data
If you see certain product groups not doing well, such as having a low conversion rate or high costs without matching revenue, you might take steps like lowering bids, checking your product feed for errors, or even removing underperforming products. Balancing your strategy based on what the numbers indicate will help you move toward a more effective campaign.
FAQ: Product Groups in Google Shopping
Organizing products into groups within Google Shopping helps control bids, monitor performance, and optimize ad spending effectively. Below are common questions and concise answers to help you understand product groups better.
What is a product group?
A product group is a subset of your inventory, categorized by attributes like brand, product type, or custom labels, allowing for better campaign management in Google Shopping.
Why should I use product groups instead of “All products”?
Using multiple product groups provides better control over bids, helps track performance more precisely, and allows for the exclusion of certain items, maximizing ad efficiency.
How do I create a product group?
In Google Ads, navigate to your Shopping campaign, go to the “Product Groups” tab, and subdivide “All products” based on attributes such as brand, category, or custom labels.
Can I exclude products from my campaign using product groups?
Yes, you can exclude specific product groups by selecting them and choosing the “Exclude” option, ensuring you don’t waste ad spend on unwanted items.
What attributes can I use to subdivide my product groups?
You can divide products by brand, product category, product type, condition, item ID, or custom labels assigned in Google Merchant Center.
How do custom labels help with product groups?
Custom labels allow you to categorize products based on parameters like price range, seasonal relevance, or profitability, making it easier to adjust bids and optimize campaigns.
What is the best way to set bids for product groups?
Base your bids on performance data—higher bids for top-performing, high-margin products and lower bids for risky or lower-performing items.
How can I tell if my product groups are set up effectively?
Monitor conversion rates, cost-per-click, and overall return on ad spend; adjust bids or restructure groups if a segment underperforms.
What happens if I over-segment my product groups?
Over-segmentation makes optimization difficult by spreading data too thin, so balance detailed grouping with maintaining enough data to make informed bidding decisions.
How often should I adjust my product group structure?
Review performance at least monthly, adjusting bids or further subdividing based on trends, seasonality, or changes in consumer behavior.
Strategically managing product groups ensures better control over Shopping campaigns, leading to improved ad performance and more efficient spending.
Want to try the #1 AI Toolkit for SEO teams?
Our AI SEO assistants helps write and optimize everything - from descriptions and articles to product feeds - so they appeal to both customers and search engine algorithms. Try it now with a free trial→