Google Shopping is a powerful way to showcase products and drive potential customers to an online store. It lets you display product photos, prices, store names, and other details right in search results. This guide will walk through the steps for setting up Google Shopping, along with some tips to ensure everything runs smoothly. While the process might seem a bit long, try to tackle it one step at a time, eventually you'll see how all the pieces fit together.
The Basics of Setting Up Google Shopping
Google Shopping ads require a couple of key components: a Google Ads account and a corresponding Merchant Center account. These two accounts must be linked so that your product feed from Merchant Center can be channeled into campaigns in Google Ads.
A product feed is basically a detailed list of what you plan to sell, including information like product name, category, image URL, price, and more. Merchant Center is where you supply all those details. Once you’ve created a Shopping campaign in Google Ads, Google will use that feed to generate ads, often referred to as Product Listing Ads (PLAs) or Shopping Ads.
Some people are unsure about the difference between a standard Shopping campaign and other types of campaigns. For reference, a standard Shopping campaign generally focuses on text, images, and product details, while Performance Max campaigns can include more dynamic ads across multiple networks. If you’re new to all of this, consider starting with a standard Shopping campaign to have more control over how the products appear in search results.
Setting Up Your Merchant Center
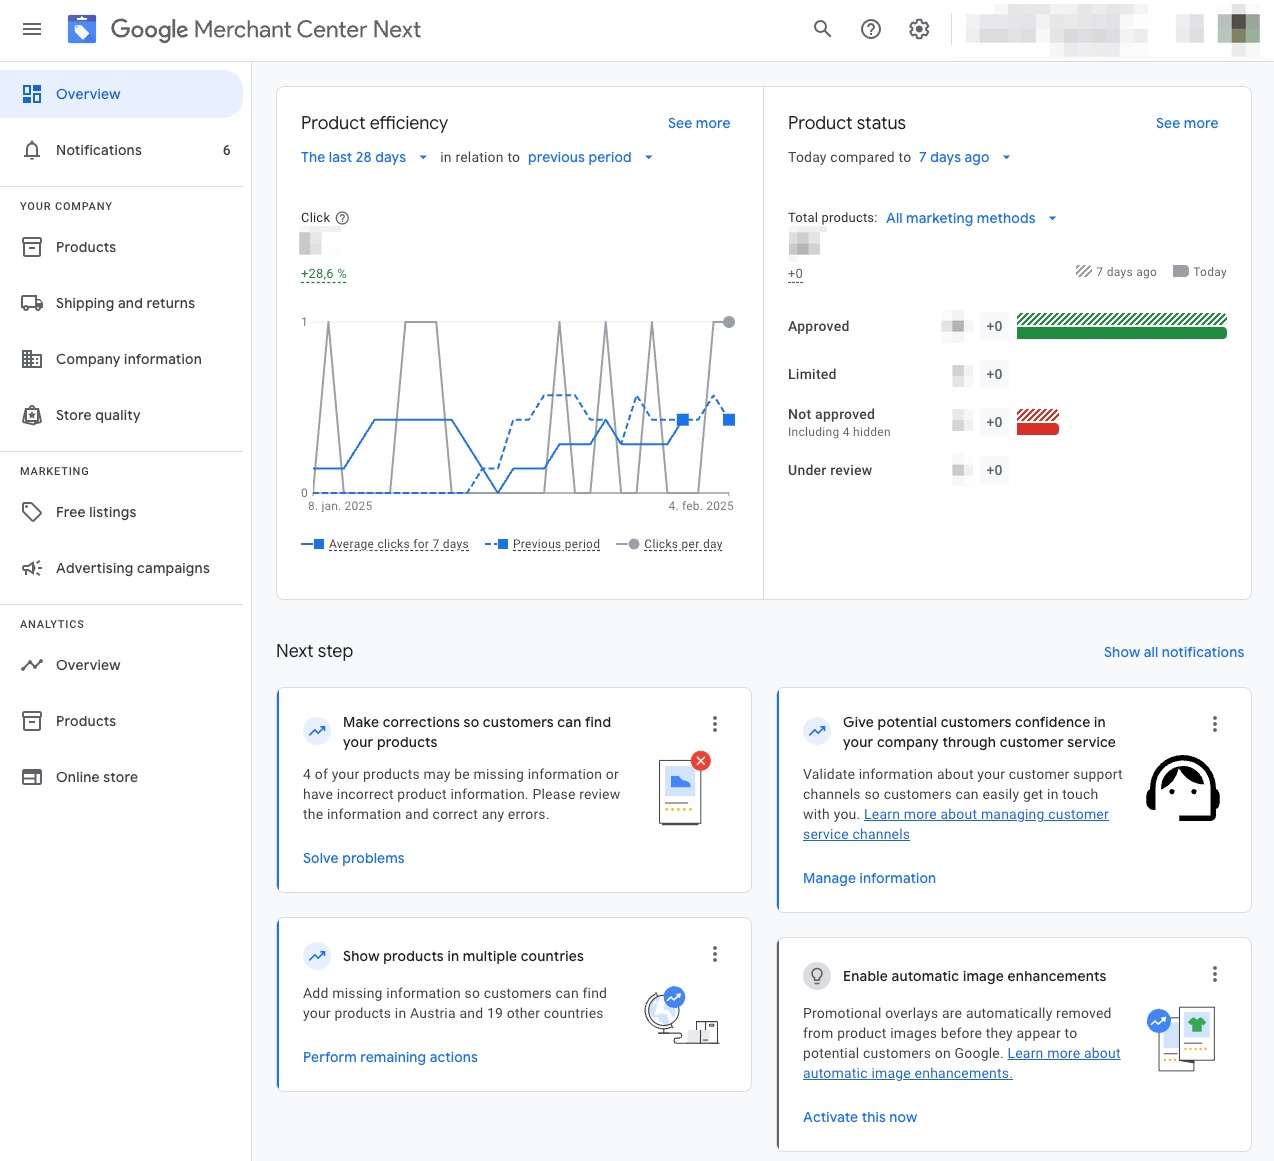
Uploading a Product Feed
Next, upload your product feed. This step is essential because the feed includes the data for all the products you want to advertise. The feed can be submitted in several formats, such as a spreadsheet or a text file. Make sure the feed is formatted in line with Google’s requirements, which typically means:
- Having the correct headers (e.g., id, title, description, price, link, image_link).
- Including valid values for each product attribute (e.g., “19.99 USD” for price).
- Keeping the feed updated, especially for price changes or product availability.

If your site changes stock and pricing regularly, it’s helpful to set up automated feed updates through an API or a scheduled fetch. That way, you won’t have to reupload a file every time your stock changes.
Linking Merchant Center to Google Ads
Once you’ve got products in Merchant Center, the next step is to link Merchant Center with your Google Ads account. This ensures that all the product data is accessible for the Shopping campaign.
- Within the Merchant Center settings, look for “Linked accounts.”
- Find the option to add a link to your Google Ads account.
- Confirm you want to allow access between the two accounts.
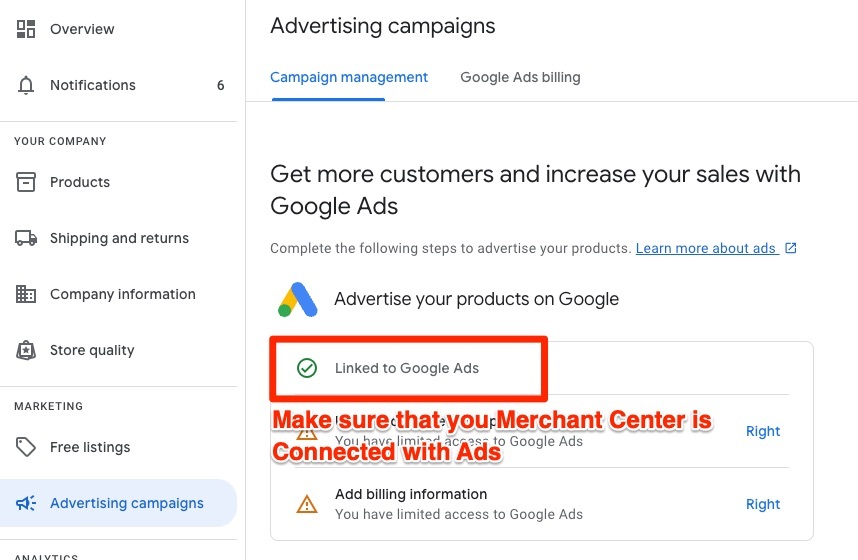
Once that’s done, the products in the Merchant Center feed become available for new Shopping campaigns. If you don’t link the accounts, Google Ads won’t have permission to show your product listings in ads.
Creating the Shopping Campaign
The main difference between a Shopping campaign and a regular text ad campaign is that you don’t need to select keywords to trigger your ads. Instead, Google matches your product feed details (like title and category) with relevant search queries. This method depends largely on how you set up your feed.
Here’s a short overview before going into each detail:
- Access your Google Ads account and click the plus button to create a new campaign.
- Choose a campaign objective (such as Sales, Leads, or Website traffic).
- Select Shopping as the campaign type.
- Choose your linked Merchant Center account.
- Decide on the campaign subtype (Standard or Performance Max).
- Choose optional campaign settings (like budget, bidding strategy, and ad networks).
- Create your first ad group.
- Set a default bid and add product groups (or initially stick with the All products group).
Step-by-Step Detail
1. Start a New Campaign
In the Google Ads dashboard, locate the plus button for creating a new campaign. After clicking New campaign, you’ll be asked to pick an objective, such as Sales, Leads, or Website traffic. If you’re unsure which objective fits best, pick the option that matches your primary goal. You could also choose Create a campaign without a goal’s guidance if you prefer not to have any suggestions.
Sometimes people overthink this part; just choose the option that makes sense for your store.
2. Choose the Campaign Type
The next step is to select Shopping as your campaign type. You’ll see a few notes about the differences between Performance Max and Shopping Campaigns. If you want specific control over your ads’ structure, opt for a Standard Shopping campaign.
3. Link to Your Merchant Center
When prompted, choose the Merchant Center account that holds your feed. If you don’t see options here, verify that you completed the linking process in your Merchant Center settings. note that you cannot change the Merchant Center account after the campaign is created.
4. Select Feeds
You will then see an option to select feeds either by feed label or by country. A feed label is an attribute in Merchant Center that helps you separate different sources of products if you have more than one data feed. Alternatively, you can pick the country of sale to determine where these products will appear. If you choose a country, ensure your feed is set up properly for that region (with the correct currency, shipping settings, and language).
5. Choose Standard Shopping Campaign
Confirm you want a Standard Shopping campaign as the subtype. This gives you more manual control over bids and product groupings than some of the automated options.
Customizing Campaign Settings
After choosing the main details—like your Merchant Center account and the feed—there are more advanced settings to further adjust your campaign. These include:
- Inventory Filter
- Local Products
- Campaign URL Options
- Bidding
- Daily Budget
- Campaign Priority
- Networks
- Devices
- Locations
Inventory Filter
The inventory filter limits which products from your feed show up in a particular campaign. This can be useful if you only want to advertise a specific subset of items—for example, only shoes. Remember that any items not meeting the filter criteria won’t appear in your ads. You can change this setting later if needed.
Local Products
This option lets you promote items available at physical store locations. You need to upload a local inventory feed to Merchant Center for location-specific data. Using this setting may result in your products appearing in ads that aim to drive in-person visits.
Bidding
Decide how you want to handle your bidding. You can choose automated strategies (like Target ROAS or Target CPA) or manual CPC bidding. Some advertisers start with a small manual bid then switch to an automated approach after gathering data. Pick a strategy that fits your comfort level and desired margins.
Daily Budget
Shopping campaigns require a daily budget that reflects how much you’re willing to spend per day. This doesn’t have to be very high, but if the budget is set too low, your ads may not appear often. Balancing budget, bids, and the number of products advertised may take some time to perfect. Checking performance daily or weekly can help you decide on adjustments.
Campaign Priority
This setting is useful if the same product appears in multiple Shopping campaigns. All campaigns start with equal priority, but you can mark one as High if you want its ads to display before those in other campaigns. This option is used mainly by retailers who create separate campaigns for different marketing goals or seasonal sales.
Networks
By default, your ads may show on Google Search Network sites and partner websites that display shopping listings. If you prefer a narrower scope, uncheck any options that do not fit your advertising strategy. Do take care when removing many options, as it might reduce your reach.
Devices
Decide whether your ads show on all devices or only on specific ones. Typically, the setting is for All since search volume can vary across desktop, mobile, and tablet devices. You can adjust bids later if needed or use modifiers for mobile.
Locations
If your store ships only to certain areas, use the location settings to target or exclude regions. You can choose to target broadly by country or narrow down to specific states, regions, or postal codes.
Creating Your First Ad Group
When you click Save and continue, you’ll be prompted to create an ad group. This is where product listings are generated automatically based on your Merchant Center feed.
- Choose a name that clearly indicates what products the ad group covers, for example, Summer Shoes or All Products.
- Enter an initial bid. Monitor performance so you can adjust the bid based on how often your ads display and the number of clicks they receive.
At this stage, you’ll see the product groups page. By default, there will be one group labeled All products. You can choose to subdivide products if desired. For instance, you might split shoes by brand, color, or price range. This lets you adjust your bids for specific products.
Managing Product Groups
A useful strategy is to start broadly with one ad group for all products to collect initial data. After a week or two, check which products have the best click-through or conversion rates. Then, create separate product groups for those items and assign them higher bids. For products that are not selling well, lower the bid or pause them.
Here is a sample structure you might use:
- All Products (initial group)
- Subdivision 1: High-Margin Items
- Subdivision 2: Low-Margin Items
A table can help visualize a possible breakdown:
This is just one option. Feel free to try different categorizations such as product type, brand, or condition, to see what works best.
Common Pitfalls to Avoid
Sometimes mistakes happen, and knowing some frequent issues can save you time.
- Poorly Formatted Feed: If your product data doesn’t follow guidelines, Google might disapprove some items. Keep an eye on your feed’s status in Merchant Center.
- Low-Quality Images: Ensure your images are clear, well-lit, and free from watermarks that may not meet guidelines.
- Ignoring Negative Keywords: Although Shopping campaigns don’t use keywords for targeting, you can add negative keywords to avoid showing ads for unrelated queries. For example, if you’re advertising running shoes, you might want to exclude dress shoes.
- Outdated or Incorrect Pricing: If the price in your ads differs from your website, Google might suspend your ads. Regularly sync your feed to reflect any changes.
- Insufficient Bidding Strategy: Setting bids too low can result in few ad displays, while very high bids may drain your budget without enough returns.
Monitoring Performance
After your campaign has run for a while, keep track of performance metrics. Some important indicators include:
- Impressions: The number of times ads are shown.
- Clicks: The number of times people click on an ad.
- CTR (Click-Through Rate): The percentage of impressions that lead to clicks.
- Conversions: The number of purchases or other desired actions resulting from these clicks.
- Cost per Conversion: The total cost divided by the number of conversions.
Use these numbers to make informed adjustments. If an item gets many impressions but few clicks, consider tweaking the product title or image. If clicks are good but conversions are few, think about adjusting your landing page or the product’s pricing.
It’s normal if this part feels heavy at first. Many advertisers check their numbers regularly and make small tweaks to improve performance, always testing different bid strategies, product group arrangements, and negative keywords.
Advanced Tips
- If you notice better performance on mobile devices, you can adjust your mobile bids. Conversely, if desktop conversions are not as strong, consider lowering those bids.
- Use custom labels in Merchant Center by assigning them to products (like seasonal, high margin, or clearance) to help build refined product groups.
- Regularly run feed diagnostics in Merchant Center. The Diagnostics tab shows any disapproved products and provides advice on how to fix issues.
- Try automated bidding strategies, such as Target ROAS or Maximize Clicks, if you are comfortable with Google’s machine learning. Make sure you have enough conversion data (at least 30 conversions over 30 days is often recommended) before switching.
Ad Quality and Relevancy
Your product titles and descriptions are very important for matching user searches. For example, if you sell a Men’s Running Shoe, ensure your product title is clear, such as “Men’s Running Shoe, Lightweight, Size 10.” A clear title helps your listing show up when people search for specific features like “men’s lightweight running shoes size 10.” Equally important is an accurate description that highlights details such as the brand or special materials.
There is no need to overdo it when it comes to style. A well-organized and clear approach usually works better than one that is vague or overloaded with keywords. Also, make sure that your landing pages correspond closely with what your ad promises. If your ad features a blue men’s jacket, the link should point directly to that product page instead of a generic homepage.
Troubleshooting
Sometimes you might notice that certain products never appear in your reports. In Merchant Center, check if they are disapproved or if there is a mismatch, for example, a pricing discrepancy. Another possibility is that your daily budget for the campaign runs out too quickly, causing your ads to stop running later in the day. In that situation, consider raising the budget or narrowing your product filter.
Another area to double-check is shipping information. Google Shopping requires accurate shipping details for the regions you are targeting. If there is an error in the shipping settings, your items might be flagged. Always keep your shipping information current in Merchant Center, especially if you run promotions like free shipping or local pickup.
Ongoing Maintenance
Google Shopping is not a set-it-and-forget-it solution. As your products, prices, or promotions change, update your feed and campaign settings accordingly. The competitive environment can also shift quickly—what works one month might not work the next because of changes in competitor actions or seasonality. Regularly reviewing performance data can help you stay on track.
A simple maintenance routine might include:
- Checking the feed status in Merchant Center weekly for disapprovals.
- Reviewing campaign metrics in Google Ads to see if you’re meeting targeted performance goals.
- Adjusting bids for products or groups that perform particularly well or poorly.
- Updating product titles, images, or descriptions if relevance issues arise.
Frequently Asked Questions About Google Shopping
Google Shopping helps businesses showcase products with images, prices, and store details directly in search results, driving potential customers to an online store. Below are answers to common questions about setting up and managing Google Shopping campaigns.
What do I need to start using Google Shopping?
You'll need a Google Ads account and a Merchant Center account, which must be linked. Your product data is uploaded to Merchant Center in a feed, and Google Ads uses that information to create Shopping ads.
How do I upload my product feed?
Your product feed can be a spreadsheet or text file containing details like product name, price, and image URL. It must follow Google’s formatting requirements, and keeping it updated ensures that ads reflect current prices and availability.
Why do I need to link Merchant Center to Google Ads?
Linking these accounts allows Google Ads to access your product data for Shopping campaigns. Without this connection, your products won’t appear in Shopping ads.
How is a Shopping campaign different from a regular ad?
Unlike search ads that rely on keywords, Shopping ads use product data from your feed to match search queries. This allows Google to automatically show ads when relevant.
What settings should I consider when creating a campaign?
Key settings include budget, bidding strategy, product groups, locations, and networks. These affect how often your ads appear and how they are targeted.
How can I improve my Shopping ad performance?
Regularly update your product feed, use high-quality images, optimize product titles and descriptions, and adjust bidding based on performance data. Negative keywords can also help refine search visibility.
What should I do if my products aren’t showing in ads?
Check Merchant Center for disapproved products, ensure your feed meets Google’s requirements, and verify that your bidding and budget allow for visibility. A low bid or exhausted budget can limit impressions.
How often should I monitor and adjust my campaign?
Review performance metrics weekly or monthly, updating bids, product data, and campaign settings as needed. Regular optimization helps maximize return on ad spend.
Can I run Shopping ads for in-store products?
Yes, you can promote in-store inventory using local inventory ads by uploading a local product feed in Merchant Center and enabling local promotions.
What’s the best way to structure product groups?
Start broad, then segment based on performance data—such as by brand, price range, or product category—allowing you to set different bids for high- and low-performing items.
Do I have to manually adjust bids all the time?
You can use automated bidding strategies like Target ROAS or Maximize Clicks, but manual bids may give better control, especially when first launching a campaign.
Google Shopping success comes from proper setup, regular monitoring, and smart optimizations. Start small, experiment, and refine your approach over time for the best results.
Want to try the #1 AI Toolkit for SEO teams?
Our AI SEO assistants helps write and optimize everything - from descriptions and articles to product feeds - so they appeal to both customers and search engine algorithms. Try it now with a free trial→