Exiting Google Shopping might seem challenging, but it's doable. You may need to adjust settings, fill out forms, or stop product feeds. While you might worry about losing customers, sometimes leaving is necessary to explore new opportunities or if the platform no longer suits your needs.
Typically, you'll need to access your account, find “pause” or “remove” options, and stop data feeds. It often involves updating or deleting listings and changing settings so your products no longer appear.
Be thorough in this process. Large businesses might need to edit many items, while smaller ones might only remove a few. Each business is different, so ensure you don’t leave any listings behind.
Potential Reasons to Stop Using a Shopping Platform
Sometimes, the business environment changes. Maybe you found that another marketplace suits your products better. Or perhaps the fees or policies became harder to manage. Whatever the motivation, it’s wise to consider the bigger picture before you act. Below are a few common reasons to get out of services that handle large-scale product searches:
- Complex product requirements that don’t align with your inventory.
- Policy changes you don’t want to accept.
- Difficulty managing or updating product data feeds.
- Seeking a new audience on a different platform.
Sometimes one single policy change is enough to make you re-evaluate your presence. Other times, it might be a strategic move to focus your marketing spend where you see better returns. Whether it’s a short-term decision or a long-term one, ensuring you have a plan for removing listings is crucial.
Key Preparations Before Removal
Taking a step back from an e-commerce aggregator usually requires a few checks to ensure everything runs smoothly. Mistakes during the process could leave old pages floating around, which can confuse potential buyers. Some key preparations include:
- Double-checking any outstanding orders related to the platform.
- Confirming that your data feed has no pending updates.
- Finding out if you need to submit any notifications of cancellation.
Set aside time to communicate with your team so everyone is on the same page. If you have fulfillment staff or folks in charge of marketing, let them know that product listings will change. It’s also helpful to keep an archive of your feed or contact details so you can refer to them if you'd like to return someday.
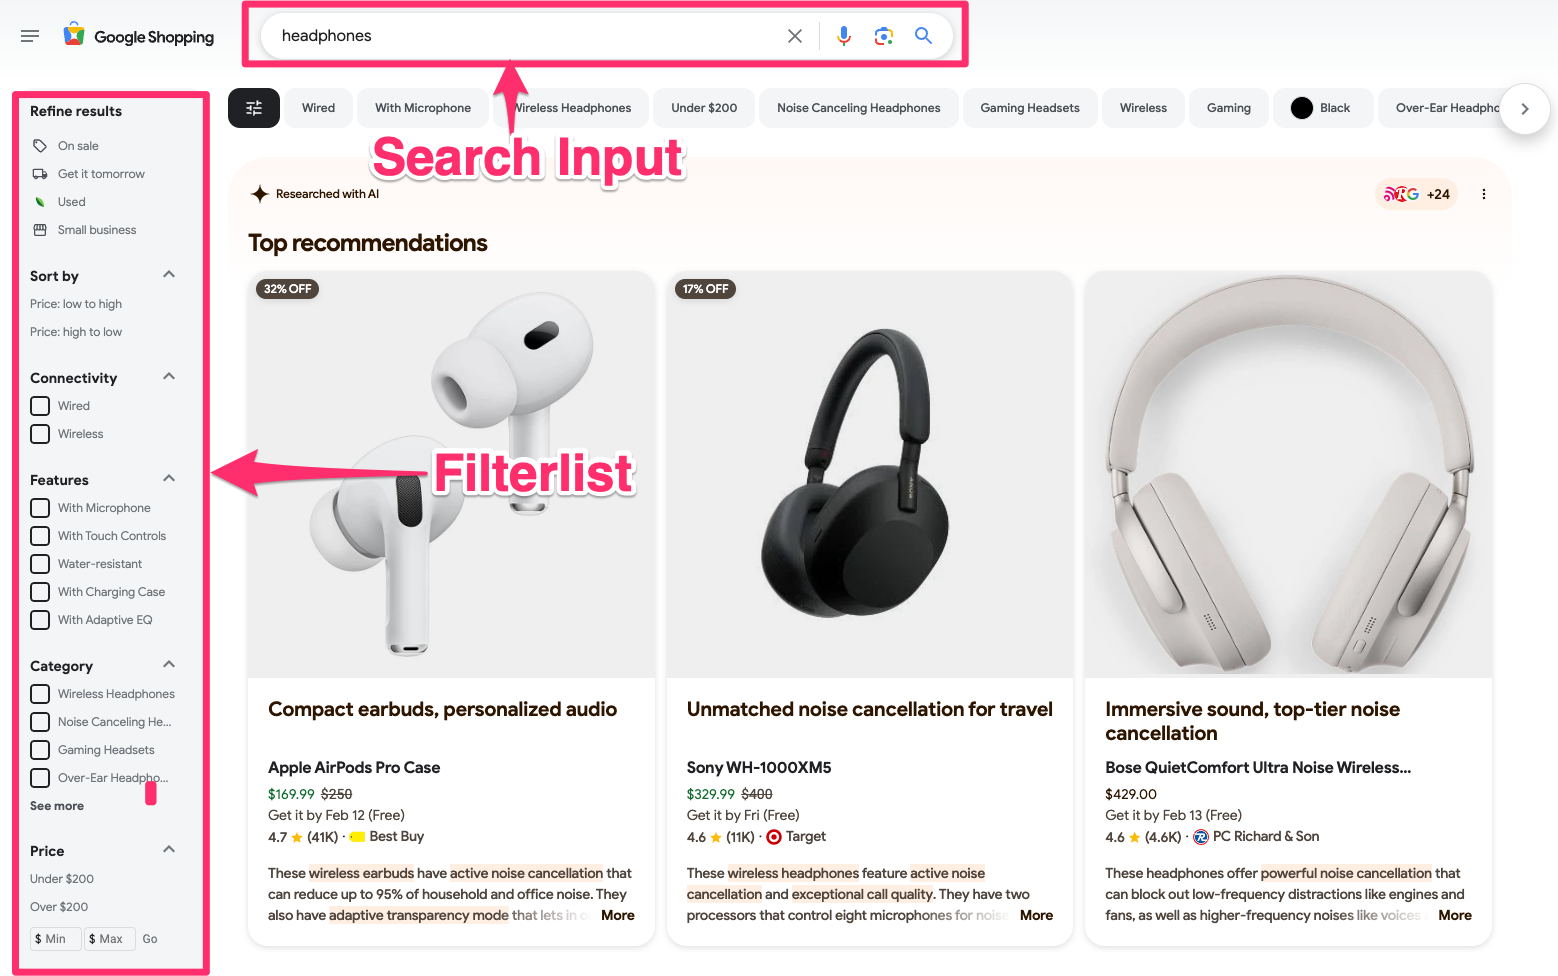
Checking Visibility
One simple tip is to search for your products on the platform. Are they still showing up? If something remains visible, that means there might be a step you missed. This visibility check can be done manually by typing in your product name or brand. If the shopping platform has advanced filters, use them to narrow in on your store as well. Monitoring after you think you’ve removed your listings helps confirm whether or not your changes have taken effect.
Sometimes a single-sentence reminder helps: Always confirm your product status before you assume everything is gone.
Removing Products or Pausing Them
Most platforms allow you to remove items from view or pause your product listings if you aren’t quite ready to delete them entirely. Pausing can be helpful when you aren’t sure if you might return. It also prevents potential shoppers from clicking on an inactive product listing, which can cause annoyance or lead to negative experiences.
In many dashboards, you might find these options under “Products,” “Listings,” or a similarly named menu. If you want to pause everything, you could select all items and apply a “pause” or “out of stock” action. This effectively hides items from people who browse, though the items might remain in your account for reference. If a permanent departure is the goal, look for a clear “Delete” or “Remove” button. It might be labeled differently depending on the interface.
Sometimes a single product removal is enough if you only had a handful of items. Other times, you’ll use a bulk edit tool or a spreadsheet upload to remove multiple items. This typically involves generating a file (like CSV or TXT) that lists the product IDs you want to remove, then uploading it through your merchant account interface. Once the file is processed, those products should disappear from searches.
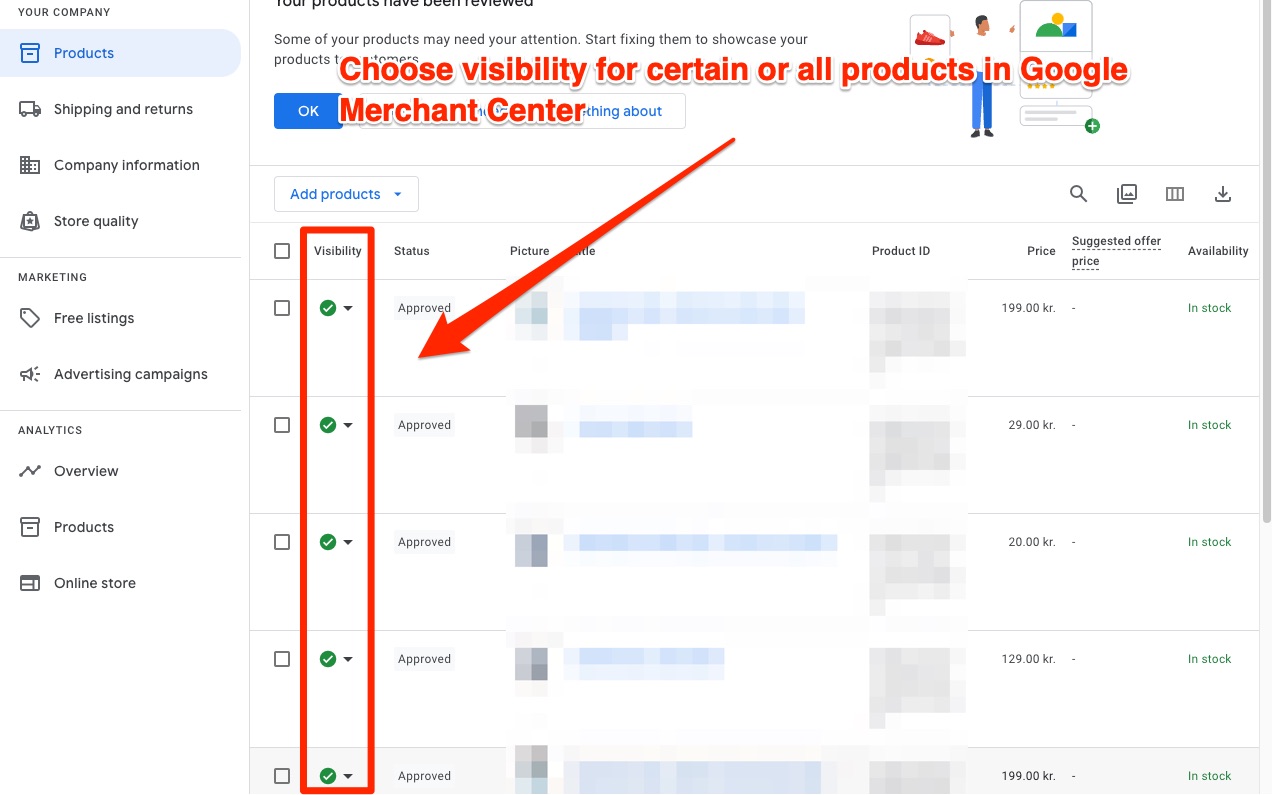
Adjusting Account Settings
After removing or pausing items, it’s good practice to review your account settings. Look for preferences related to product feed scheduling, automatic item imports, and other tasks that might reinsert products later. Setting your data feed to manual updates can prevent your listings from being automatically refreshed. In many cases, data feeds can be deactivated or deleted entirely so they no longer provide any new information to the platform.
Be aware, however, that some changes might take time to propagate. You might see a note saying “This can take up to 48 hours” or something similar. Patience is part of the process, but it never hurts to run daily checks until you’re sure everything is gone.
Possible Approaches
There isn’t a one-size-fits-all solution. Different business owners handle their transition in various ways. Below are a few approaches:
- Completely remove all products and close the account.
- Remove specific products, keep the account open, but pause the feed.
- Temporarily mark products as out of stock or discontinued.
- Update shipping or payment settings to turn off the integration.
Each approach might lead to different outcomes. A complete account closure is the most definitive but also might require you to create a new account if you ever decide to return. Simply removing products while keeping the account alive can give you flexibility for future changes.
Table of Common Issues
Here's your information formatted as a table:
Some of these are more likely than others, but it’s good to keep them in mind. Clicking a button to remove listings is one part of the process. Staying vigilant for unexpected reappearances is the follow-up step that ensures everything is truly resolved.
Practical Suggestions for Clean Removal
A smooth exit requires a few practical steps in addition to the main ones:
- Consider backing up your listings by exporting them, in case you need to replicate them somewhere else.
- Document any changes you make. This can be as simple as keeping a log noting the date and time you removed products from your feed.
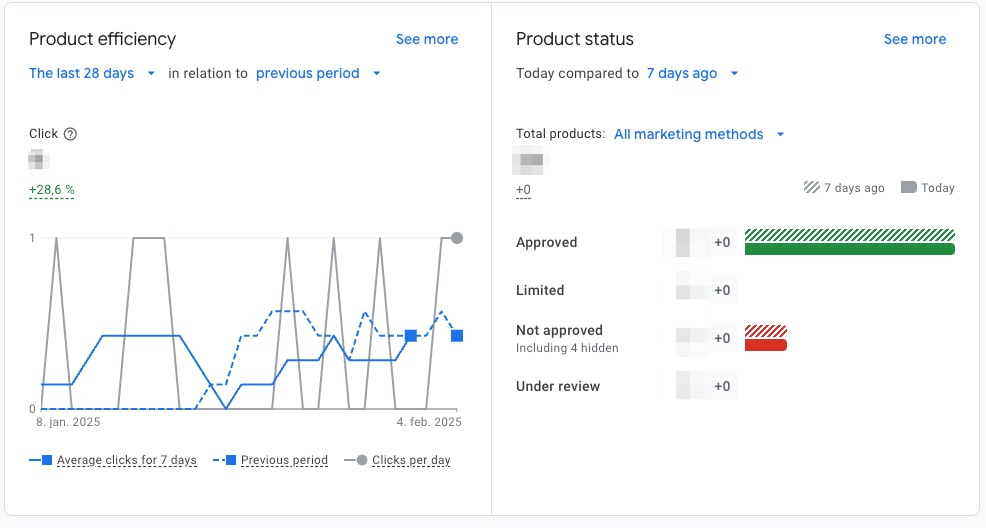
- Check your store’s analytics to see if referrals from the platform’s domain drop to zero. If there’s still traffic, investigate which listings might still be active.
Simple checks like these lower the risk of missing an item. A common frustration is discovering months later that a stray product listing was never updated or removed, leading to potential confusion for anyone who clicks it.
Handling Inactive Feeds
One method involves marking your entire feed as “inactive” instead of fully deleting it. That way, the service won’t pull new data from your shop. Another method is to set your feed to upload an empty file, effectively telling the system there are no products. This is a gentle approach since it doesn’t necessarily close all your doors if you change your mind next week.
A single-purpose feed might be used if you only want to remove certain products. In that case, you might upload your main feed minus the products you no longer want. Over time, the platform sees that certain items aren’t there and removes them. It’s crucial to confirm how often the system updates though. If it only checks once a month, you may have to wait a bit longer for items to completely disappear.
Monitoring the Process
Try to keep an eye on your store listings daily at first. Most removals happen within a set timeframe, but different systems can vary. After a few days, do a quick search for the product names. If everything is working, they should no longer appear in the listings or search results. Regular checks reduce the chance of discovering an issue too late.
Sometimes, not all items go away at once. You might remove 200 items, but 20 remain due to an error. In that case, investigate the difference in your feed ID numbers. Double-check you didn’t miss a row or assign an incorrect identifier. It’s easy to overlook small details when handling large spreadsheets or bulk product files.
Balancing Business Impact
Stepping away from a large-scale shopping platform can affect sales and brand exposure. If it was a significant source of income, you might notice an immediate dip. It’s wise to plan for this. Maybe you’ve already set up a new marketplace channel or e-commerce site to capture lost sales. Alternatively, you might expect a temporary reduction in revenue while you reorganize your selling strategy.
One-sentence paragraph:
Always make sure your business is ready for changes in visibility or income streams.
Communication is also key. If you had loyal customers who found you through that platform, consider how they’ll locate you in the future. Some businesses send out announcements or newsletters through other channels. Others rely on organic traffic to their main website. The choice is yours.
Step-by-Step Outline for Feed Editing
Here’s a general outline you can adapt to your situation:
- Log into your merchant account or dashboard.
- Navigate to “Products” or “Data Feeds.”
- Locate the option to edit or remove products.
- Download your current feed to keep a backup.
- Remove or modify entries for items you want gone.
- Upload the updated feed or manually delete items one by one.
- Confirm you have disabled any automatic re-uploads.
- Wait the specified time for changes to appear.
- Verify by searching for your products on the platform.
Questions About Policy
People often wonder if there are any extra steps for policy compliance. In many cases, you aren’t obligated to keep your listings active. However, it’s worth scanning any agreements you signed to ensure no obligations remain. If you still have open returns or refunds related to the platform, finalize those first. That ensures a clean break without leaving buyers in the dark.
Skimming through the policy might reveal a recommended procedure for removal. Some places outline a preference for how to deactivate listings to ensure minimal disruption. Others are more relaxed, allowing you to remove listings at any time, without a formal process. In any case, knowledge of the rules helps you avoid accidental violations.
Handling Partial Removal
Not everyone wants to drop every single product. You may have a few seasonal items that didn’t sell well. In that case, partial removal can be a happy medium. Simply indicate which product IDs you want removed in your data feed. Or pause those listings within the merchant interface if that’s an option.
Reduced coverage might also free resources for you to promote only your best sellers. Some businesses use selective presence to focus on top-performing items while removing slow-moving inventory from the platform. This approach can be beneficial if you want some presence but not the entire range of products.
Collaboration with Team Members
If your online business includes multiple team members, let them know about your plan to exit or reduce presence on the shopping platform. This prevents anyone from accidentally uploading new or updated products. It may help to hold a quick meeting about the reasons for the removal and the steps you’re taking so everyone can coordinate.
Take special note if someone on your team handles ads or marketing. They might need to pause campaigns that direct users to the platform listing pages so you aren’t paying for clicks that land on missing or inactive product pages. A short internal checklist can keep tasks organized:
- Notify the marketing department.
- Confirm any software integrations are turned off.
- Review your e-commerce website to remove references to the platform.
Data CleanupData cleanup can be overlooked, but it’s important. If you had product descriptions or images optimized for that platform, you might store them in a folder or database for future use. Sometimes these images or descriptions are unique. Having them in one place can simplify your next move if you decide to join another channel.
Also, check if there are leftover tracking codes used for analyzing traffic from the platform. Removing those codes can declutter your site analytics. This helps you maintain an accurate picture of where your traffic and sales are coming from now that you aren’t on that marketplace.
Reviewing Online Mentions
Occasionally, external sites or blogs might still mention your product listing on the platform. You can’t always control that, but you can do a quick brand name search to see which links appear. If you find a site directing people to a listing that no longer exists, consider updating them with your new store link if possible. This step isn’t mandatory, but it can help keep potential customers from hitting a dead end.
In some cases, affiliates may have been linking to your product page. They might want to know that the listing is inactive. Reaching out to them with updated links can preserve relationships. Ultimately, it keeps everyone aligned on where your products can be found moving forward.
Turning Off Alerts
If the platform has any alert or notification system that reminds you to restock products, make sure to turn it off. Sometimes, you’ll keep receiving messages about items being out of stock or data feed errors. Disabling those can help you avoid confusion in the future. If you keep getting alerts, you might think your store is still active.
Also, consider unsubscribing from any promotional emails that encourage you to optimize or reinstate your listings. These can clutter your inbox and distract you once you have already decided to move on. Keeping your email environment clear helps you focus on other priorities.
Exploring Alternative Channels
There are many different ways to sell products online. If you chose to leave one platform, you might explore a few others. That could include social media marketplaces, smaller niche marketplaces, or your own website with a built-in shopping cart. Each channel has its own audience, fees, and policies. It’s often wise to do a small test first before fully committing.
Sometimes a single-sentence observation is enough:
New channels can help you reach untapped audiences.
Before you invest heavily in a new platform, read its terms to make sure it aligns with your business model. You can also talk to other sellers or read reviews to see if their experiences match your goals. Taking a measured approach reduces the chance of repeating frustrations that may have led you to leave the previous service.
Redirecting Shoppers
Even if you leave a shopping platform, consider ways to let clients know where they can find you next. For instance, if you still run ads on search engines or other places, you might direct users straight to your own website instead of the aggregator. This way, you maintain a sense of continuity. Your loyal fans should be able to locate your official store without confusion.
Think about your packaging and shipping inserts as well. Some businesses include notes guiding customers to their main site for reorders. If you used a platform’s shipping features, you might need a new shipping solution. That could be a private label shipping account or another service that offers easy integration. Planning these details keeps your operations running smoothly.
Compliance and Documentation
Keep a record of the day you removed your products and made changes to your feed. If for any reason you need proof that you’re no longer affiliated with that platform, you’ll have a reference. This can come up if a customer claims they found your listing on an outdated link. Having a simple log of dates, times, and steps taken can help confirm that your shop is no longer connected.
Sometimes it’s also wise to store screenshots of your dashboard in case you need to verify that your products were removed by a certain date. This might sound overly cautious, but it’s better to have the documentation and not need it than to need it and not have it.
Next Steps
When you see no more references to your products on the platform, and you’ve turned off all relevant data feeds, you can continue with your new selling strategy. The transition might be complete, and you’ll rarely need to look back. If you later decide to return, the steps often involve re-verifying your site or re-uploading a new product feed.
One final reminder: Check your credit card statements or payment methods to ensure no unexpected charges occur after your departure. If you do see a new bill, it might mean you missed a subscription toggle. These details can save you money and frustration down the line. If everything looks good, you can relax knowing your listings are out of the platform’s system.
Frequently Asked Questions About Removing Your Listings from an Online Shopping Platform
Navigating the process of removing your listings or presence from a major online shopping platform can seem overwhelming at first. Below are concise answers to common questions that will help make the process easier and more efficient.
Why would I stop using a shopping platform?
Common reasons include high fees, policy changes, mismatches between your inventory and the platform’s requirements, or exploring other marketplaces. Strategic shifts like targeting a new audience or focusing on higher returns elsewhere can also motivate this decision.
How do I prepare before removing my listings?
Ensure you address any outstanding orders or returns, confirm your data feed has no pending updates, and notify your team to avoid disruptions. Preparing clear communication with staff and having a backup of your feed ensures a smoother transition.
How do I check if my products are still visible?
Search for your product names or brand on the platform manually. Use filters if available to narrow results to your store. If listings still appear after removal, double-check your account settings or data feed for lingering items.
What options do I have for removing listings?
You can either pause listings if you’re considering a temporary break or remove them permanently through your merchant dashboard. Bulk removal tools or data feed adjustments allow for efficient management of larger catalogs.
Should I adjust my account after removing products?
Yes, review your account settings to prevent automatic reuploads via data feeds. Deactivate or delete feeds to avoid listing reactivations and monitor the platform for 24–48 hours to confirm all changes take full effect.
What if I don’t want to remove my entire account?
Partial removal lets you hide specific items while keeping your account active. Pausing products or selectively marketing top-performing items is a flexible solution to maintain some presence without a full departure.
Can leaving the platform affect my business?
Yes, you might notice a dip in traffic or sales if the platform was a major source of income. Mitigate this by shifting focus to other channels, such as your website or alternative marketplaces, to recapture lost visibility.
How do I document the removal process?
Keep a record of steps taken, including feed changes, product removals, and any emails or notifications about cancellations. Screenshots of your empty dashboard can act as proof if needed later.
What happens if products remain visible after removal?
Errors can sometimes cause lingering listings. Recheck your feed for missed items, ensure automatic updates are off, and resubmit updated or empty files if necessary. Contact support if visibility persists after waiting a few days.
Are there alternatives after leaving a platform?
Yes, you can explore other sales channels like niche marketplaces, social media stores, or your own e-commerce site. Testing these options before committing fully helps you determine the best fit for your products and audience.
How can I redirect customers to my new store?
Use ads, newsletters, or packaging inserts to communicate your updated shopping links. Consider SEO optimization for your main website to capture organic traffic from loyal and new customers alike.
By following these steps and guidelines, you’ll have a clear path to smoothly transitioning away from the platform while minimizing disruptions to your business operations.
Want to try the #1 AI Toolkit for SEO teams?
Our AI SEO assistants helps write and optimize everything - from descriptions and articles to product feeds - so they appeal to both customers and search engine algorithms. Try it now with a free trial→